How to remove Dell monitor stand? A monitor stand is a basic component of any computer setup and is not an item that requires assembly. Nevertheless, by following the steps below, you can easily remove the stand without mishap.
Eventually, you might need to take off the Dell monitor stand, whether for transport or better ergonomics reasons.
Particularly if you’re worried about damaging your monitor, this process can seem daunting at first.
The article is intended to teach you how to take off the stand from Dell monitors without causing any harm.
Precautions
Taking safety precautions is a must before removing your Dell monitor stand. Make certain that the monitor is disconnected from the power supply at the top.
This initial action is crucial to avoid electrical shock or damage to the monitor’s components.
Obtaining a flat surface to place the Dell monitor is the next step. The monitor’s screen should be cleaned of any liquids or objects that could scratch it. A soft cloth can be used to protect the screen when laying it facedown.
Lastly, be cautious when managing Dell monitors at the time of the stand removal process, due to their weight and awkwardness, so take your time and consider asking for help.
After we discussed safety, let’s talk about the tools you’ll require for the task.
Tools and other required items
The removal of your Dell monitor stand is a straightforward process requiring minimal tools. Detaching the stand safely without any damage is made easier with these tools.
- with the help of special tools, such as a screwdriver or a hexagon socket wrench. The majority of Dell monitor stands are secured with Phillips head screws.
- to be on the safe side and ensure your Dell monitor stays scratch-free, it’s best to use a soft cloth as a plane surface to put your Dell monitor on. When you set it down with its face facing downwards to take off the stand, this will safeguard the Dell monitor against scratches.
- although not a standard tool, a small container or cup can be very advantageous. This can be utilized to hold small parts that are removed at the time of this process.
- if you would like instructions on how to take off the stand, please check out the User’s Manual for instructions.
Quickly taking the stand from the Dell monitor can be done with the help of the supplies mentioned above.
Dell has provided instructions that can be found in their user manual. Check out the instructions, as depending on the model there are different methods of detachment.
Next, we need to identify the components and begin the removal process of the Dell monitor stand.
Stand components identification
Despite the slight variation in design depending on the Dell monitor model, most stands are made up of two main components:
Base – this part of the stand rests on the table. Typically, the monitor stand is flat and has a round or rectangular shape, providing stability for the monitor.
The neck acts as a connection between the monitor base and the back.
In most cases, the vertical part is responsible for adjusting the height and sometimes the tilt or rotation of movements.
A guide to removing the monitor stand
As soon as we possess the tools and components necessary for the stand, we can continue with the method for the Dell monitor stand removal in a methodical manner.

Checking readiness
- To get started, disconnect the monitor from its source of current.
- Make certain that the plane and flat surface are utilized.
- Get a soft cloth or towel to safeguard the monitor.
- Find a location that is suitable and has sufficient lighting.
- Correct readiness is crucial for the next steps.
- Put the Dell monitor on the cloth with its face down.
Cables disengagement
Cables disengagement from your Dell monitor is necessary before removing the stand.
- Disengage the monitor from the source of the current and shut it down.
- Identify the wires by inspecting the rear wall panel.
- The electric wire is to be found and disconnected from both the monitor and the source of the current.
- At last, verify any other peripheral cables and remove them.
Once you have satisfactorily disengaged all the wires and connections, it is within your power to take off the stand. To prevent tangles or misplacements, keep the disengaged wires safe.
Decoupling the base
The stand base of your Dell monitor is ready to be taken off, and here are the instructions to follow:
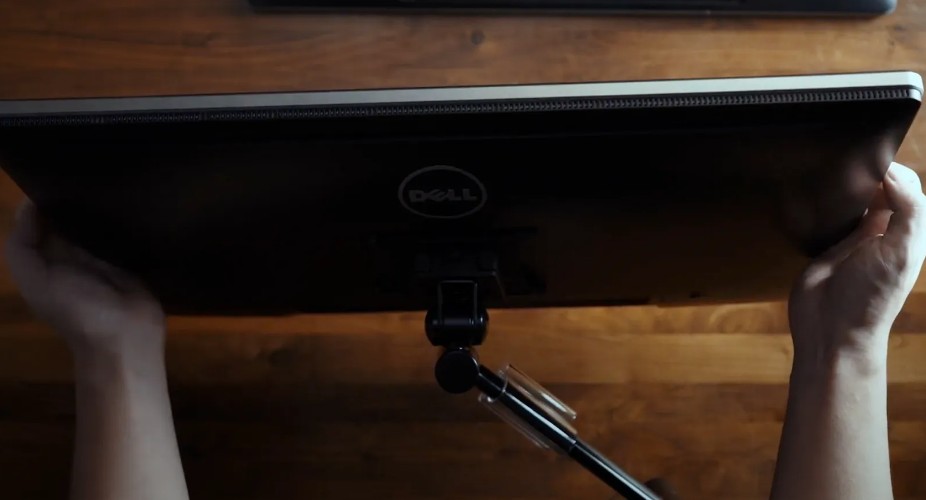
- Identify the release button or lever on the monitor’s back. The placement of the release button is dependent on the monitor model, but it is generally situated in close proximity to either the bottom or sides of the stand.
- Use one hand to press and release the stand. Press the release button with a small amount of pressure.
- While simultaneously pushing the release button, gently take off the stand from the monitor. Remove it from one side and then the other side.
Getting rid of the stand arm
Take the utmost care when removing the stand arm. It’s crucial to adhere to these five steps:
- Locate the release button or latch located near the arm and monitor the attachment.
- To unlock, either press or slide the release button.
- Use one hand to hold the arm and use the other to lift the monitor. Gradually separate them.
- Ensure that the stand arm is stored in a secure location after removing it and if you plan on reattaching it.
- Verify that there are no parts that are damaged or missing.
Refasten the cover
To finish the process of taking off the stand, it’s necessary to refasten the cover of the Dell monitors. To guarantee a safe and effortless refasten, adhere to these 3 steps:
- Make certain that the tabs fit into their slots and that the cover is aligned over the back of the monitor.
- Gently press and apply even pressure to the entire length of the cover. Avoid using excessive force as it could result in damage to the cover or monitor.
- Make sure the cover is stable by shaking it.
To maintain the monitors and protect against dust, it is important to refasten the cover. If you have removed the stand – well done! You can be proud of yourself for taking this challenging job.
With the Dell monitor stand removed, your monitor is now in the process of being mounted on a wall or matched with a different stand for positioning.
But keep in mind that the removal process can differ depending on the model of the Dell monitor, as different models have different types of stands.
Some Dell monitors feature a VESA cover that requires removal before the stand can be fully taken off.
The rear mounting holes are typically concealed by a VESA cover, a small plastic piece. Pressing and lifting the tabs on either side of the cover will allow the cover to be taken off.
Always consult the user manual, and device instructions or contact Dell’s customer support if you encounter any issues or need to correct something. If the procedure is not followed correctly, it could result in damage to the monitor or injury to the user.
Resolving issues during the stand removal
Despite the best guides, it’s possible to run into problems when trying to perform the Dell monitor stand removal.
Here are some typical problems and their solutions:
Screws are difficult to move. If the screws are not moving, don’t force them as this could damage the screw head.
Instead of using a screwdriver that doesn’t fit properly, try using a different one. A screwdriver with a larger handle might be necessary if the screws are particularly tight.
Stand is difficult to slide out. If the stand doesn’t come off, it could be stuck because of pressure or dust accumulation. Move the stand to loosen it, but take care not to exert too much force or end up damaging your monitor.
After removing the stand, the monitor shakes. If the monitor shakes after removing the stand, it’s most likely because the screws that held it in place are still present in the monitor.
Before installing a new stand or mounting the monitor on a wall, make sure to remove any screws or mounting brackets.
Screws are lost. No screws? New screws can be ordered from the website or a trusted store. Make certain that the screws you acquire are of the correct size for your specific monitor model.
Final part
Congratulations! You have mastered the process of your Dell monitor stand removal. From collecting the tools to identifying the stand components and removing the stand, this guide has taken you through each step of the process.
It’s crucial to use the user manual and instructions or Dell’s official website for model-specific instructions, even though this guide provides a general overview of the stand removal process.
When working with electronic devices, safety should always come first.
Whether you’re transporting your monitor or changing your workspace, knowing how to correctly take off the Dell monitor stand is a valuable skill. Good luck with your future tech endeavors and hope this guide has been helpful.
If you need to read about How long does a monitor last, please read our article.
Topics & Questions
The questions mentioned below can be addressed satisfactorily with these good answers.
To take off the Dell monitor stand, it’s important to unplug it and place it on a stable surface with a cloth underneath for monitor protection.
Find the screws that connect the monitor stand on the back of the monitor.
Unscrew screws with caution using a screwdriver. Remove the screws and slide the stand out of the monitor.
But if you run into any problems, refer to the user manual and instructions for your Dell monitor or contact Dell Support.
To take off the stand from your Dell monitor s2721ds, first disconnect the power cord from the back of the monitor.
The next step is to find the four screws at the base of the stand.
After that, use a screwdriver to extract these screws.
Pull the stand away from the monitor gently. Be mindful not to break any of the cords or connections.
All you have to do is turn off the power and unplug the external cables, and they’re easy to follow.
The stand can be removed by tapping a button on the red circle.
Take out the stand according to the given instructions or user manual.
The screen should be placed on a smooth surface after the stand is taken out to avoid damage.
To take off a Dell VESA mount, disconnect the monitor cables.
Remove the screw if there is a VESA locking screw installed.
Pressing down on the plastic tab located on the VESA mount can release the VESA plate.
Get rid of the monitor cables.