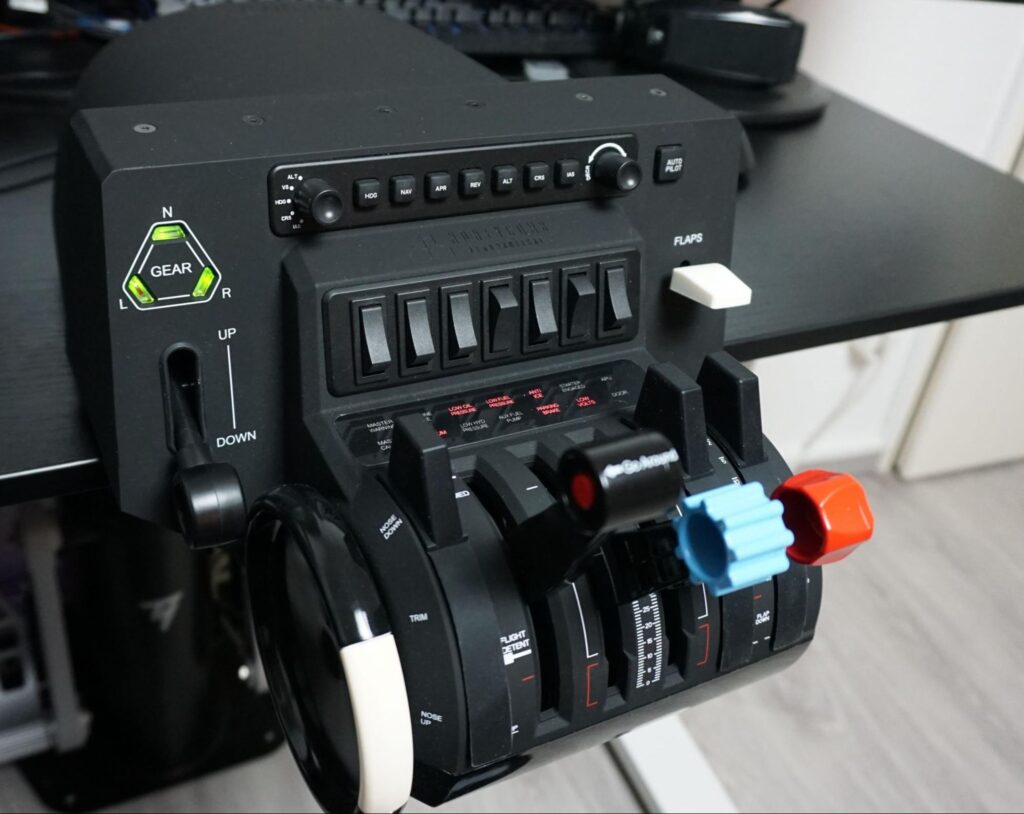
From single-engine to four-engine aircraft, Honeycomb Bravo has always dominated the market of cockpit systems. Unfortunately, there’s been a problem with this throttle quadrant recently.
People have been noticing that the on-screen light indicator on the Honeycomb Bravo isn’t working. It has the users frustrated.
So, what should you do if honeycomb bravo on screen light indicator not working?
Firstly, try reinstalling the Honeycomb and Aerosoft drivers to fix this problem. Secondly, reconfiguring the Honeycomb throttle can get rid of this issue. Lastly, manually executing the exe.xml file can work as well. You can also try installing a fresh exe.xml file and whitelisting it from your antivirus.
Don’t stop reading because this article will provide a step-by-step walkthrough on repairing the indicators on your Honeycomb Bravo.
Honeycomb Bravo on Screen Light Indicator Not Working: Quick Fixes
Implementing quick fixes before complex ones can narrow down the problem if not fix your Bravo throttle. I’ve included some quick fixes to get the on-screen indicators back to a working state. Give them a try!
Restart Microsoft Flight Simulator:
This is the first thing a PC user should do to avoid program errors. A restart of the MSFS can help fix the screen light issue with the Honeycomb Bravo throttle!
The simplest way to restart Microsoft Flight Simulator is to press Control + F4 on your keyboard. Windows will exit the simulator after doing that. Then, relaunch the Microsoft Flight Simulator for a fresh start.
Try relaunching the MSFS in administrator mode to avoid problems like the flight simulator getting stuck.
Switch Between Configurations:
If you’ve got multiple configurations in your Microsoft Flight Simulator, you can try switching between the configs. To switch between the configs-
- First, go to the main menu of the Microsoft Flight Simulator.
- Then, go to ‘Options’.
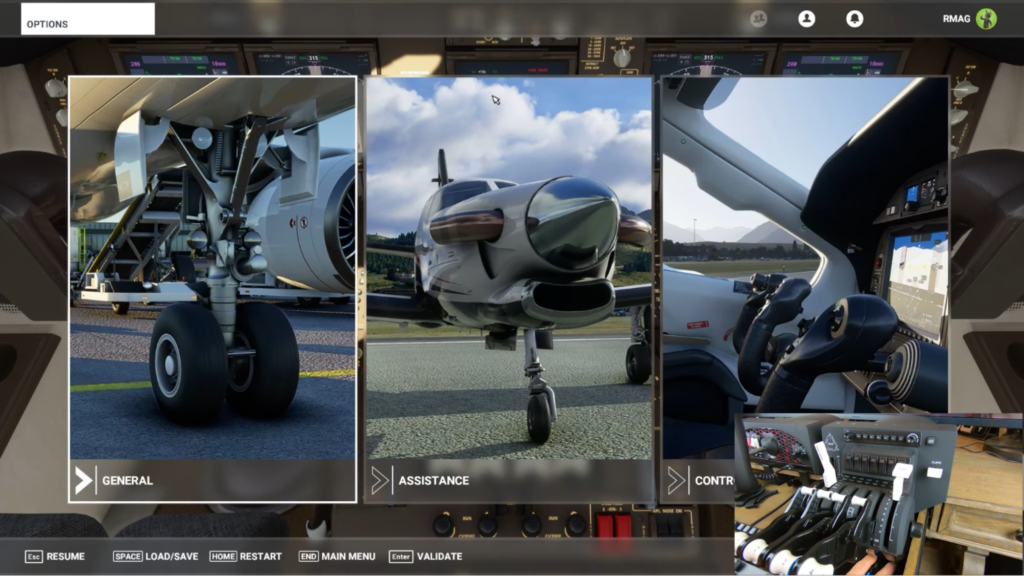
- Next, go to the ‘Controls’ section.
- From there, you can scroll through the profiles under the ‘Bravo Engine Throttle’ section.
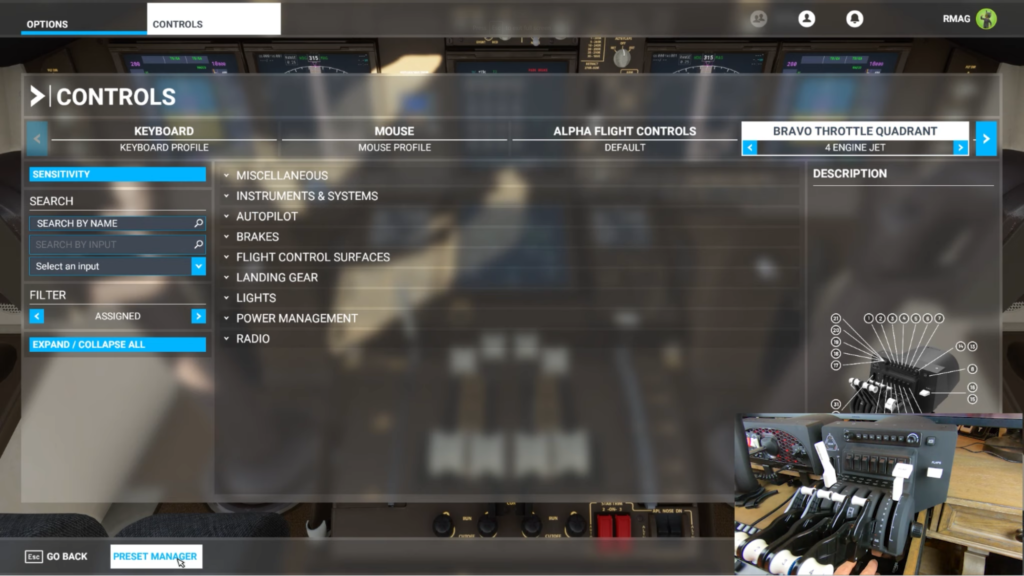
- Finally, you can change the profile and press F11 to save. Right after that, change back to your original profile and press F11 to save again.
Switching between configs applies different settings to the Honeycomb Bravo throttle. This sometimes kicks the on-screen light indicators back to functionality.
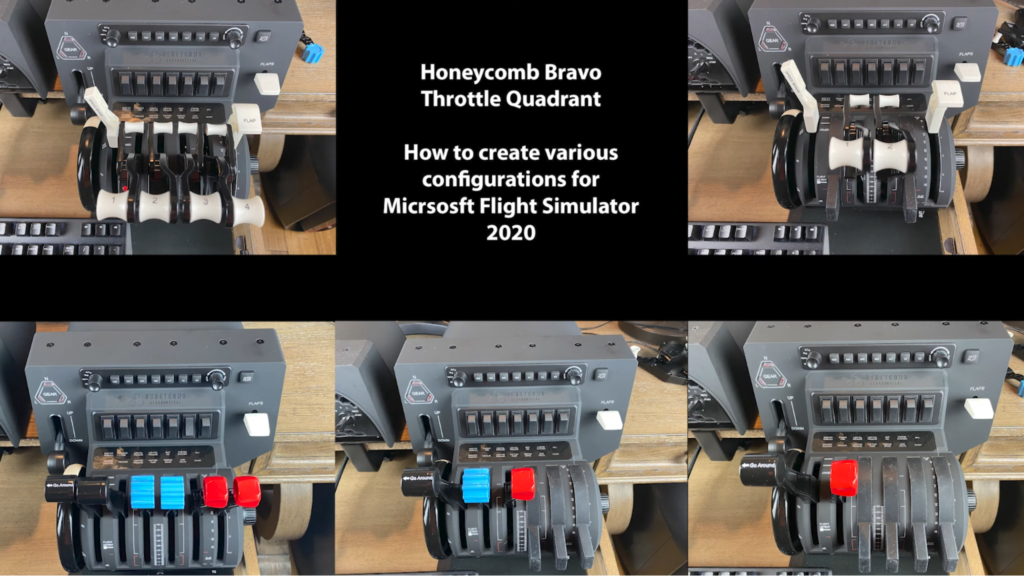
If you don’t have different configurations, you can create some by following this video:
Honeycomb Bravo on Screen Light Indicator Not Working: 3 Reasons and Solutions
Now it’s time to know a bit in-depth about the reasons behind the light indicators not working. Not to worry though; you can find the step-by-step solutions along with the reasons! So, don’t waste any time and start diagnosing this issue.
Reason 1: Buggy Updates:
If you’re a veteran Microsoft Flight Simulator user, you should know that some of the MSFS updates are buggy.
These buggy updates can cause a mishap in the processes and steal the functionality of the on-screen indicators. In fact, you might inspect that there’s no sound from Microsoft Flight Simulator due to the bugs.
Solution: Reinstall the Honeycomb and Aerosoft Drivers
The solution to this problem is to uninstall and reinstall honeycomb and aerosoft drivers. To uninstall and reinstall the aerosoft driver-
- First, go to the control panel and click ‘Programs and Features’.
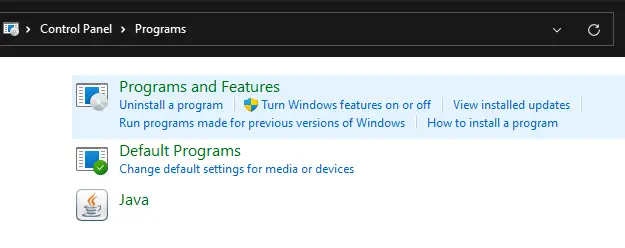
- Then, look for the aerosoft program in the list. Then, select the program and hit uninstall.
If you cannot find aerosoft in the listing of programs, you’ll have to do it manually. To uninstall the aerosoft drivers manually, go to ‘My PC’ and search ‘aerosoft’.
- From there, go to the installation folder for aerosoft and find the ‘uninst.exe’ file. Double-click on that file to start uninstalling the aerosoft drivers.
- Finally, you can go to the official website of aerosoft and reinstall the drivers.

To uninstall the honeycomb driver, follow the above steps to uninstall it. Then you can go to the official website of Honeycomb and download the driver for the Bravo throttle. Then reinstall the Honeycomb driver.
Reason 2: Throttle Configuration Problems
Most Microsoft Flight Simulator users use the default throttle configuration to fly aircraft. Yet, the throttle configuration may have problems that can lead to the light indicators failing to work.
Solution: Reconfigure the Throttle
For this solution, you will have to reconfigure the throttle. You can use the Bravo Throttle Configurator to configure the throttle.
First, run a mock setup for a CFG file. There, you can click the toggle for enabling LED. It should apply a new set of settings to the CFG file (exe.xml/SimConnect).
Then, start configuring the throttle. Keep your Microsoft Flight Simulator throttle menu open.
Method 1: Setting up the Throttle for an Airbus
Start by holding the throttle reverse thrust. Then, slowly decrease the throttle until it adjusts itself.
Method 2: Setting up the Throttle for a Boeing Plane
First, find the 2 small flip switches on the throttle. Set them to hold the reverse thrust of the throttle. If you flip both of the switches, the twin-engine will flip. It will go in reverse and the power will depend upon the thrust lever.
Also, assign an axis for the speed brakes and flaps. All that’s left is the calibration of the throttle.
From the MSFS menu, go to the MCDU menu. Then go to ‘Config’ and then to ‘Controls config’. From there, start calibrating the flaps and the throttles.
Follow the chart below to calibrate the throttles-
| Throttle Calibration | |
| Reverse 100 | 0% |
| Reverse Idle | 0% |
| Idle | 0% |
| Climb | Preferred axis input |
| FLEX/MCT | Preferred axis input |
| TOGA | Preferred axis input |
Follow the chart below to calibrate the flaps-
| Flaps Calibration | |
| Flaps 0 | 0% |
| Flaps 1 | 25% |
| Flaps 2 | 50% |
| Flaps 3 | 75% |
| Flaps full | 100% |
Remember to store the settings by clicking on ‘Store Calibration’. Now you’re all set to enjoy the game! By the way, you can enjoy MSFS even further by playing on a 4K gaming monitor.
Reason 3: Exe.xml File Not Executing
Whenever the Honeycomb Bravo throttle’s connected to your PC, there’s also an executable file running with it. The file is known as the “AFC_bridge.exe” and it runs in the background.
However, in some cases, the “AFC_bridge.exe” file might not execute when the Honeycomb Bravo is being used. This may happen because of a problematic executable file.
Moreover, your Windows defender or antivirus may block this file intentionally. That way, the file never gets executed.
As a result, many features of the Bravo throttle don’t work, which includes the on-screen light indicator.
The executable file not being executed can steal more features and impact other add-ons. For example, VDGS, FS2Crew, etc.
Solutions:
There are 3 solutions to this problem. For the 1st solution, you have to manually execute the exe.xml file and link it to the taskbar. The 2nd solution consists of installing a fresh exe.xml file. The 3rd solution is whitelisting the
Solution 1: Manually Execute Exe.xml File
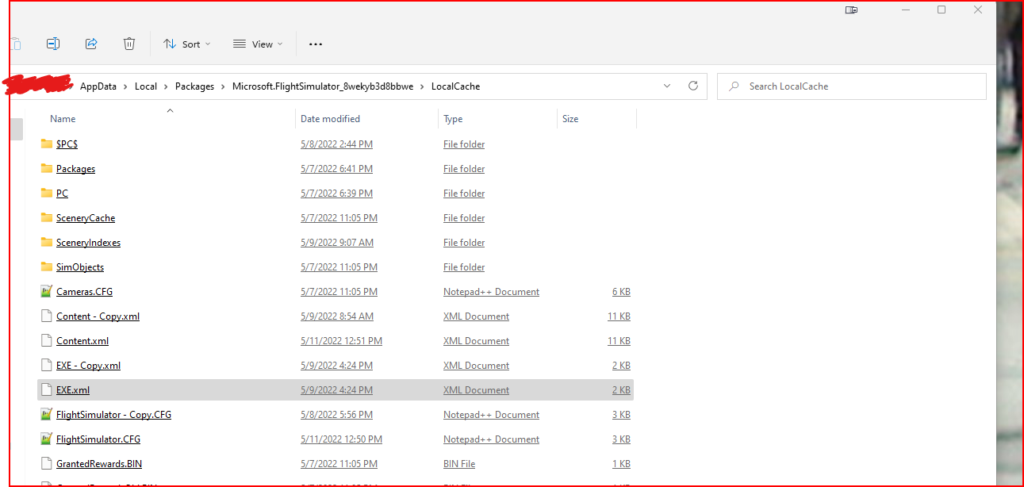
The path you have to follow is- “C:\Users*your User Name*\AppData\Local\Packages\Microsoft.FlightSimulator_8wekyb3d8bbwe\LocalCache\Packages\Community\AFC_Bridge\Bin\AFC_Bridge.exe”.
You’ll have to run this executable file when you’re in the main menu of the Microsoft Flight Simulator. This will kick-start the application and bring back life to the on-screen light indicators.
For convenience, set a shortcut on your desktop that leads to the path of the AFC_bridge.exe file.
Solution 2: Install a Fresh Copy of the Exe.xml File
The 2nd solution to this problem is installing a fresh copy of the exe.xml file. To do this-
- First, go to- ““C:\Users*your User Name*\AppData\Local\Packages\Microsoft.FlightSimulator_8wekyb3d8bbwe\LocalCache” and delete the existing exe.xml file.
- Then, reinstall the Honeycomb driver. You can follow the steps from the 1st solution mentioned earlier in the article.
Doing so will install a fresh copy of the exe.xml file in the “C:\Users*your User Name*\AppData\Local\Packages\Microsoft.FlightSimulator_8wekyb3d8bbwe\LocalCache\Packages\Community\bin” folder. - Finally, launch the exe.xml file, triggering the Honeycomb driver manually and the lights should come back on.
Solution 3: Whitelist AFC_bridge.exe
If you’re using an antivirus, you have to whitelist it. You can use the application to whitelist the .exe file for the antivirus.

It also might be blocked by Windows defender. In that case-
- First, open ‘Windows defender firewall’ from the search box of the taskbar.
- Then, click on ‘Allow an app or feature through Windows Firewall’. After that, click ‘Change settings’ and scroll down to look for ‘AFC_Bridge.exe’.
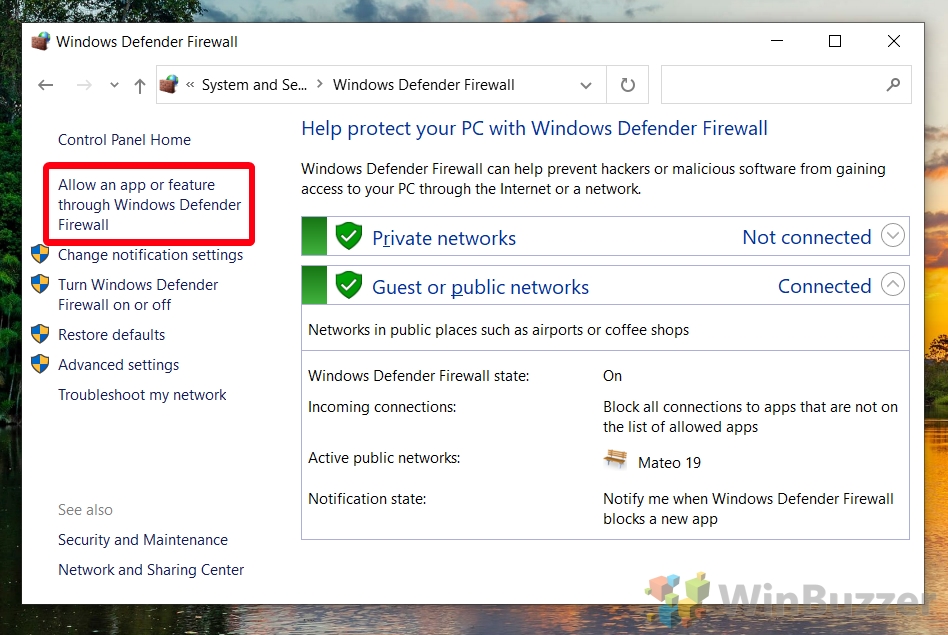
- Finally, check the boxes on the right under the ‘Private’ and ‘Public’ sections and hit ‘OK’.
Frequently Asked Questions (FAQs):
What is the warranty on a Bravo throttle quadrant?
The Bravo throttle quadrant comes with a 5-year warranty of the box. It also comes with different accessories and replacement parts. Mounts, throttles, and USB cables are included with the Honeycomb Bravo.
Is the Honeycomb Bravo Throttle good?
Yes, the Honeycomb Bravo throttle is really good. It is versatile and easy to use. Moreover, the attention to detail of the Bravo throttle has been praised by users so many times. The setup and the device itself look and work amazing.
What comes with Honeycomb Bravo?
The Honeycomb Bravo comes with an autopilot and annunciator panel. It also provides a lot of accessories such as 2 clamps, 1 USB cable, 1 mounting plate, etc. Additionally, you’ll get a user manual along with 12 throttle levers.
The Final Words
That’s all the reasons and solutions behind the honeycomb bravo on screen light indicator not working.
If the solutions above aren’t doing it for you, try submitting the throttle under warranty. The manufacturer will replace it with a new one if your throttle’s defective in any way.
Best of luck.
